CRM integrations and data synchronization
First published on March 18, 2026 , updated on March 18, 2026VOGSY supports seamless data synchronization with your favorite Customer Relationship Management (CRM) tools. If your sales team uses a CRM to create and manage opportunities, they can continue to do so without interruption. When importing new data from the CRM, VOGSY automatically creates all necessary opportunities, organizations, and contacts as required.
Currently, VOGSY supports data synchronization with the following CRMs:
Salesforce
Copper
HubSpot
Zoho
Pipedrive
Requirements for synchronization
In order to successfully sync an opportunity from your CRM with VOGSY, the following conditions must be met:
Owner match: The email address of the opportunity's owner in the CRM must match an active employee in VOGSY.
Name: The opportunity must have a name.
Stage mapping: The current stage of the opportunity must be mapped in VOGSY, and the 'Synchronize opportunities in this stage' option must be selected.
Revenue: The opportunity must have a revenue value.
Dates: The opportunity must have both a creation date and a close date.
Contact info: The opportunity must include an associated contact with a first name, last name, and email address.
Integrating VOGSY and your CRM
To start synchronizing data, you must first integrate VOGSY with your CRM. This generally requires two main steps:
Connect to the CRM (via VOGSY settings).
Map opportunity stages to ensure the statuses align properly between systems.
Configuring webhooks to provide VOGSY with live updates
Connect to your CRM
To activate the connection between the CRM and VOGSY, you must have the Support staff role and admin rights in your CRM. Before you can connect, make sure you have a VOGSY subscription, a subscription to your respective CRM software, and a VOGSY user with the Support staff role.
Connecting VOGSY to your CRM requires logging in to your CRM site and granting access. Go to your CRM website and log in. The final step is to authorize VOGSY to connect to your software, which provides VOGSY with an access token that allows it to access the CRM on the user’s behalf.
Open the CRM setup section of the Setup assistant and click Connect an external CRM.
Select your specific software from the Select your CRM drop-down list and click Save.
Click to authorize VOGSY on the connection screen to finalize the setup.
Mappable fields
Once VOGSY is connected to your CRM, you must map your CRM opportunity stages to their VOGSY counterparts.
One-to-one mapping: Directly link each CRM stage to a specific stage in VOGSY.
Multi-pipeline support: Configure unique mappings for multiple CRM pipelines simultaneously. Each pipeline is displayed on a separate tab within VOGSY for easy management.
Bulk initial import: Use the Import to VOGSY checkboxes to select which stages to include in the initial sync. Clicking Import triggers a one-time, comprehensive sync of all opportunities across all pipelines based on your mapping rules.
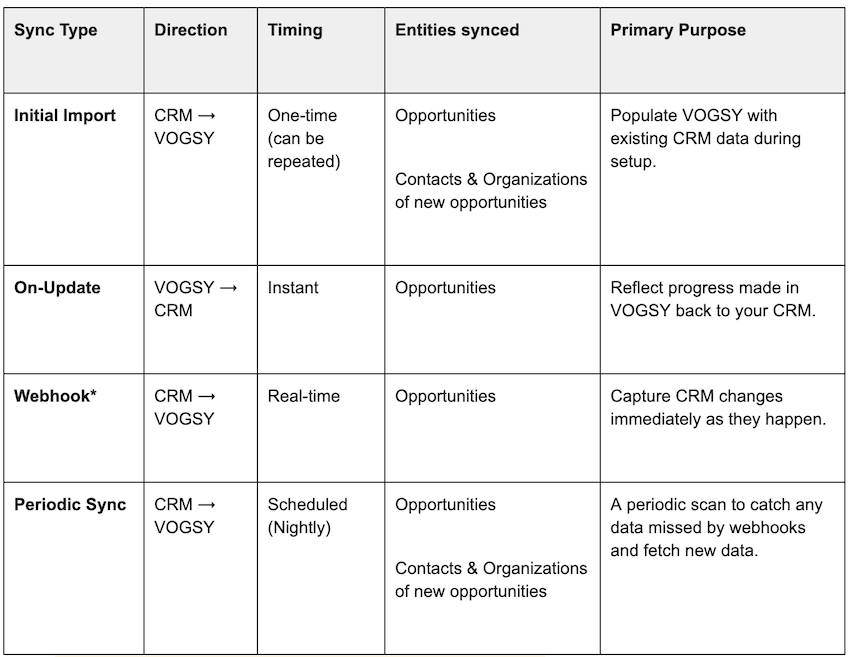
Data synchronization
VOGSY maintains data integrity through a robust, two-way synchronization process with your integrated CRM. This ensures that your opportunities, organizations, and contacts remain consistent across both platforms.
1. Initial import (CRM to VOGSY)
When you first map your CRM opportunity stages to VOGSY, you can trigger an initial import, which can also be retriggered if needed.
Scope: All opportunities currently in a mapped stage are imported.
Entities: This process also imports associated organizations and contacts.
Matching logic: If these entities already exist in VOGSY, they are updated via a match on Company Name (for organizations) or Email Address (for contacts).
2. On-update sync (VOGSY to CRM)
VOGSY ensures your CRM is always aware of the progress of the opportunity.
Trigger: When an opportunity is updated within VOGSY.
Condition: The update is pushed to the integrated CRM only if the opportunity is currently in a mapped stage.
3. Webhook sync (CRM to VOGSY)
For real-time updates, VOGSY utilizes webhooks (when configured) to capture changes made to an opportunity directly in your CRM.
Trigger: An update occurs within the CRM system.
Condition: Data is pushed to VOGSY instantly, provided the opportunity remains within a mapped stage.
4. Periodic sync (CRM to VOGSY)
VOGSY performs regular checks for new and updated opportunities.
Process: VOGSY periodically scans the connected CRM for any new or modified data.
Updates: It imports new opportunities and updates existing ones that are in a mapped stage.
Associations: Just like the initial import, new opportunities will automatically bring over their associated organizations and contacts.
Synced fields reference
VOGSY synchronizes the following data points between your CRM and the VOGSY platform.
Organization data The following fields are mapped to ensure your client accounts remain consistent:
Organization Name (Primary key used to match existing organizations)
Description
Address
Phone
Website*
Country*
Account Manager
Person (contact) data Contacts are synced to ensure the right stakeholders are linked to your projects:
First Name
Last Name
Salutation and job title*
Email (Primary key used to match existing contacts)
Opportunity data The core of the synchronization focuses on the sales pipeline:
Opportunity Name
Description*
Stage
Opportunity Date
Close Date
Expected Start Date*
Expected Finish Date*
Sales Probability
Revenue
Account Manager
Contact
* Note: These fields are only synchronized where available in the integrated CRM system.
Data synchronization summary
How to turn off data synchronization
If you need to disconnect your CRM and halt data synchronization, follow these steps:
Open the VOGSY back office.
Scroll down to the Third party integrations section.
Click the settings link for your specific CRM.
Click Disconnect.